06 - Setup
Version 15.1 by Eric Nantel on 2022/04/29 07:07
CAUTION: Before powering the motors, ensure they rotate in the same direction on each side. If the wiring between the motors and the Sabertooth was done correctly, the motors on each side of the robot should rotate in the same direction. If you are at all uncertain, it is safest to remove the sprockets and test the motors. If they rotate in opposite directions, the wiring to the Sabertooth needs to be corrected.
| 1. Set the Sabertooth DIP Switches for your needs | |||
| Sabertooth 2 x 12A Standard | Typical Setup | ||
 | 1 | OFF (Enable RC Mode) | |
| 2 | ON (Enable RC Mode) | ||
| 3 | OFF (Lithium Battery Mode) | ||
| 4 | OFF ( Enable Independent Mode) | ||
| 5 | ON (Disable Exponential) | ||
| 6 | OFF (Disable Timeout) | ||
| Sabertooth 2x12 - Dip Switch Wizard | |||
| Sabertooth 2x12 - User Guide | |||
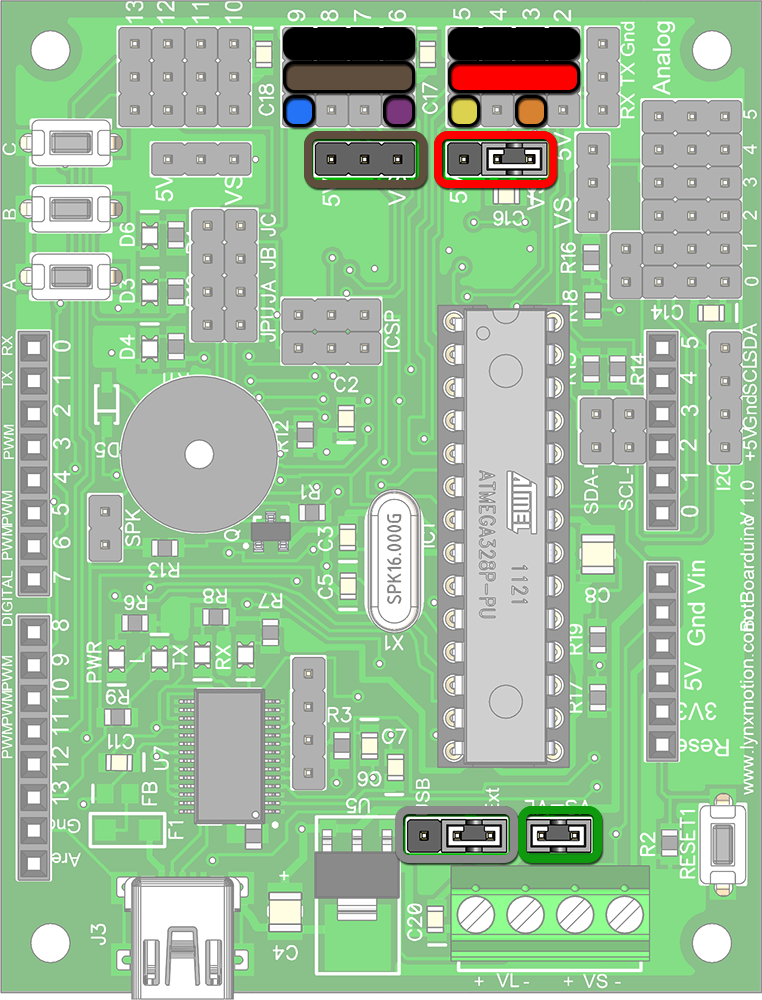
| 2. Connect the Sabertooth to your Microcontroller | |||
| Jumper on "VS" to use the Sabertooth as the power source for the BotBoarduino | ||
 | No Jumper to isolate the middle row and avoid conflicts | ||
 | Ground or 0V | ||
 | D3 To S1 on Sabertooth #1 | ||
 | D5 To S2 on Sabertooth #1 | ||
 | D6 To S1 on Sabertooth #2 | ||
 | D9 To S2 on Sabertooth #2 | ||
 | Jumper on "Ext" to power the BotBoarduino from the Sabertooth 5V regulator | ||
 | Jumper on "VL = VS" to link the two together | ||
| 3. Load the microcontroller with Code | |||
| Lynxmotion GitHub - Arduino A4WD3 Examples | |||
| 4. Connect the battery | |||
| 5. Enjoy | |||

| The following steps are described for the Lynxmotion BotBoarduino microcontroller and Dimension Engineering Sabertooth 2x12A DC motor controller. Note that the DIP switch setup for other Sabertooth motor controllers may not be the same. Should you have selected a different microcontroller, FPGA or single board computer, or a different motor controller, it is your responsibility to read the user guide and understand the electronic setup, connections and power requirements. | ||
| 1. Set the Sabertooth DIP Switches | ||
| Sabertooth 2 x 12A Standard | Typical Setup | |
| 1 | OFF (Enable RC Mode) |
| 2 | ON (Enable RC Mode) | |
| 3 | OFF (Lithium Battery Mode) | |
| 4 | ON (Enable Mixing Mode) | |
| 5 | ON (Disable Exponential) | |
| 6 | OFF (Disable Timeout) | |
| 2. Connect the Sabertooth to your Microcontroller | ||
| Jumper on "VS" to use the Sabertooth as the power source for the BotBoarduino | |
| No Jumper to isolate the middle row and avoid conflicts | |
| Ground or 0V | |
| To "S1" on Sabertooth #1 | |
| To "S2" on Sabertooth #1 | |
| D6 To S1 on Sabertooth #2 | |
| D9 To S2 on Sabertooth #2 | |
| Jumper on "Ext" to power the BotBoarduino from the Sabertooth 5V regulator | |
| Jumper on "VL = VS" to link the two together | |
| More Info: BotBoarduino User Manual | ||
| 3. Connect the main battery (required to power the BotBoarduino) | ||
3. Upload your code | ||
| ||
| 5. Enjoy | ||