
Controlling an Arm with the Bot Board (Basic Atom) and the SSC-32
Last modified by Eric Nantel on 2024/07/03 09:21
|
Controlling an Arm with the Bot Board (Basic Atom) and the SSC-32 |
||
| Make the connection Before I discuss how to write a program to control the arm, we need to make the serial data connection. The SSC-32 includes a short two conductor cable assembly. The black wire goes to ground and the yellow wire is for the signal. The .1" spaced end goes to the SSC-32 where it is marked with RX and the ground symbol. You will need to make sure the SSC-32 is set for 38.4k baud. It will be necessary to remove the DB9 enable jumpers if present to make this connection. The yellow wire goes to RX, and the black wire goes to ground. The .2" spaced end goes to the Bot Board I/O pin 15. The black wire goes closer to the outside edge of the board, and the yellow wire goes closer to the IC. Note, the nylon standoff has been removed for this photo. |
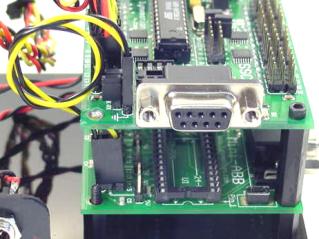 Figure 1. |
|
| Enabling the servos SSC-32 will not send out servo pulses until it receives the proper command. The program to the right will enable channels 10 through 15. This will make all of the servos go to their mid positions, or 1500uS. Note, all serout commands need to be one continuous line of text. If you cut and paste from here you will need to remove the CR's. Note, later you can substitute the 1500's with other starting positions to prevent the arm from jumping. |
|
|
| Move the arm smoothly The next program will move the arm from the initial position, to a new position, then to another new position, then cycle back and forth. The moves are slow and smooth. They will each take 2 seconds to complete. Note, these servo values are arbitrary, you will need to replace them with the actual positions you want the arm to move to. |
|
|
| Code specific to the arm By using variables and the gosub command the code can be simplified to read easier. This program will accomplish the same thing as the previous one, but you can change the position with a name instead of a number. The first serout still uses the servo channel number though. |
|
|
| In conclusion I hope you find this simple tutorial helpful. I will add more content in the future. Now you can control the Lynx arms easily and eloquently from a BASIC Atom / SSC-32. Happy Roboting, Jim Frye |
||