
BRAT Biped Autonomous Tutorial
Biped BRAT Autonomous Tutorial
Updated December 20, 2011
Safety first! Wear eye protection and never touch a powered robot!
Hardware required: Bot Board II, BASIC Atom Pro 28, Sharp GP2D12 sensor, Buffered 2-Axis Accelerometer (DE-11).
Software & downloads:
- BASIC Micro Studio
- BRAT Servo Offset Finder Program v3
- Autonomous Walk Code
- Autonomous GP2D12 Code — Videos: Avoiding obstacle · Taking a break · Proximity beeps
- Autonomous 1-Axis Accelerometer Code — Video: Getting up front and back
- Autonomous 2-Axis Accelerometer Code — Video: Getting up front and side
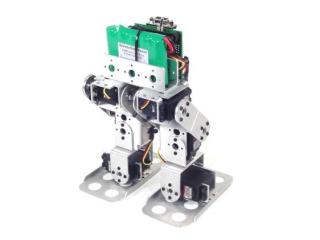
Biped BRAT.
Make sure your servos are plugged into the appropriate channels per Table 1. Note: P9 is used by the speaker and cannot be used for a servo.
| Bot Board I/O | Connection |
|---|---|
| P4 | Left Ankle |
| P5 | Left Knee |
| P6 | Left Hip |
| P7 | Right Ankle |
| P8 | Right Knee |
| P10 | Right Hip |
Set the Bot Board II jumpers per Table 2. The VS to AX0 jumper enables the program to monitor servo battery voltage — when the battery is low the robot can beep a warning. Refer to Figure 2 for the jumper layout.
| Bot Board II Jumper Settings (Table 2) | |
|---|---|
| Enable | A, B, and C buttons |
| 5V | I/O Group 0–3 |
| VS | I/O Groups 4–7 and 8–11 |
| Enable | SPKEN (Speaker Enable) |
| Enable | VS (Servo Voltage) to AX0 (P16) |
Figure 2 — Jumper diagram
Download and install BASIC Micro Studio. Download the BRAT Servo Offset Finder Program v3, load it into the IDE, and program the Atom Pro. Then use the buttons to find offsets:
- A — decrease servo offset by 5µs
- C — increase servo offset by 5µs
- B — change which servo is being adjusted, and save offsets (order shown in Figure 3)
If the Speaker is enabled, pressing B plays a tone that rises in pitch as you cycle through servos, and drops to a longer tone when returning to Start.
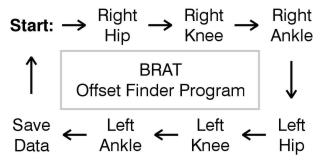 Figure 3 — Servo offset finder sequence.
Place the robot as close to neutral as possible and turn it on. It should hold the neutral position resembling Figures 4-1 through 4-3. If any joint is off by more than 15°, remove the servo horn, rotate to align, and reattach. Use the A, B, and C buttons to fine-tune.
Note: HS-422 hip servos may oscillate when the robot is lifted off the ground — this is normal and minimal when walking. Higher voltage makes oscillations worse. Higher-power servos (HS-475, HS-485, HS-645) do not exhibit this.
After adjusting all servos to match Figures 4-1 through 4-3, pressing B saves the offset values to the Atom Pro's EEPROM.
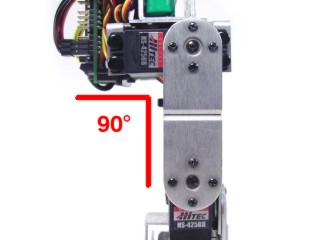 Figure 4-1 (front view).
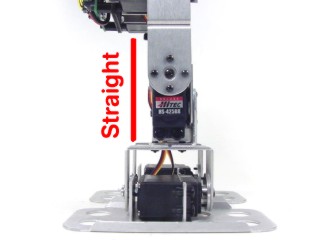 Figure 4-2 (side view).
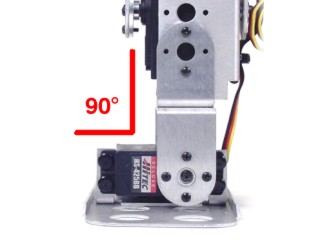 Figure 4-3 (rear view).
Download the BRAT Autonomous Walk Code, load it into the IDE, and program your BRAT.
The BRAT will now walk autonomously following this sequence: walk × 3, turn, long-stride × 2, kick, turn, stop. To customise behavior, modify the code between the labels "main" and "move", or create new sequences following the format below the "move" label.
Use double-sided tape to attach the GP2D12 sensor to the BRAT's head area, facing the front. Exact position is not critical. Plug the sensor into the channel shown in Table 6.
| Bot Board I/O | Connection |
|---|---|
| P19 (AX3) | GP2D12 Sensor |
Table 6.
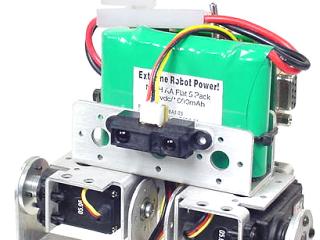 Figure 6 — GP2D12 sensor mounted.
Download the BRAT Autonomous GP2D12 Code, load it into the IDE, and program your BRAT.
The BRAT can now roam without bumping into obstacles. The sensor is read before each step. A short low beep means nothing is detected; the beep rises in pitch as objects get closer. At ~8" the robot backs up one step, turns left two steps, then continues. A looping counter periodically puts the robot into a resting position. LEDs illuminate based on the current command.
Videos: Avoiding obstacle · Taking a break · Proximity beeps
Use double-sided tape to attach the accelerometer to the BRAT's head area. Axis orientation is critical — follow the orientation shown in Figure 8 exactly. Plug the sensor into the channels shown in Table 8.
| Bot Board I/O | Connection |
|---|---|
| P17 (AX1) | Accelerometer Y Axis (front-to-back tilt) |
| P18 (AX2) | Accelerometer X Axis (side-to-side tilt) |
Table 8.
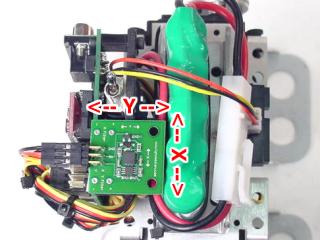 Figure 8 — Accelerometer orientation.
Download the BRAT Autonomous 1-Axis Accelerometer Code, load it into the IDE, and program your BRAT.
This program uses only the Y Axis to detect front-to-back tilt — the BRAT can tell when it has fallen forward or backward and get back up. The X Axis will be incorporated in Step 10.
Video: Getting up front and back
Download the BRAT Autonomous 2-Axis Accelerometer Code, load it into the IDE, and program your BRAT.
This version adds the X Axis for side-to-side tilt detection — if the BRAT falls onto its side it will roll over to get back up. It also includes an improved "get up from back" routine for robots with heavy cabling, and a "startled" behaviour: if the BRAT is resting and the GP2D12 suddenly detects an object, it will lean back and beep.
Video: Getting up front and side