
Controlling an Arm with the Bot Board (Basic Stamp 2) and the SSC-32
Controlling an Arm with the Bot Board (Basic Stamp 2) and the SSC-32
The SSC-32 includes a short two-conductor cable assembly. The black wire goes to ground and the yellow wire carries the signal. The .1" spaced end connects to the SSC-32 at the pins marked RX and ground — remove any DB9 enable jumpers if present. Yellow goes to RX, black to ground.
The .2" spaced end connects to Bot Board I/O pin 15. The black wire goes toward the outside edge of the board; the yellow wire goes toward the IC.
These examples are for a BS2, BS2-E, or stamps with similar timing. The 6 in the serout command specifies non-inverted, 8 data bits, no parity, 38400 baud. All serout commands must be a single continuous line — remove any line breaks if copying from this page.
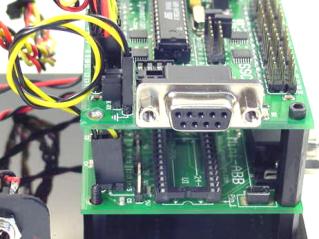 Figure 1 — Bot Board to SSC-32 serial connection.
The SSC-32 will not output servo pulses until it receives a valid command. The code below enables channels 10 through 15, sending all servos to mid-position (1500µs). Later you can substitute the 1500 values with a desired starting position to prevent the arm from jerking on startup.
This program moves the arm from its initial position to a new position, then to another, cycling back and forth. Each move takes 2 seconds to complete using the T2000 time parameter. Replace the servo values with the actual positions you need.
Using variables and gosub makes the code easier to read and maintain. This program does the same as the previous one, but each joint is referenced by name. Only the initial serout still uses raw channel numbers.
In Conclusion
You can now control Lynxmotion arms easily and elegantly from a Basic Stamp 2 / SSC-32. More content will be added in the future.
Happy Roboting,
Jim Frye