
BlueSMiRF and SSC-32 Configuration Tutorial
BlueSMiRF and SSC-32 Configuration Tutorial
By James Frye — Updated June 18, 2007
This tutorial helps connect a SparkFun BlueSMiRF to the SSC-32 for use with LynxTerm or the SEQ-01 Visual Sequencer. Range tested at over 50 feet indoors using the 582 ceramic antenna module.
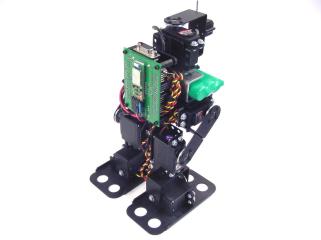
BRAT with BlueSMiRF.
You will need a Bluetooth USB Dongle (WRL-00150) plus one of the following modules:
- Bluetooth Modem BlueSMiRF — Internal ceramic antenna (WRL-00582)
- Bluetooth Modem BlueSMiRF RP-SMA — External antenna (WRL-00158) + 2.4GHz Duck Antenna RP-SMA (WRL-00145)
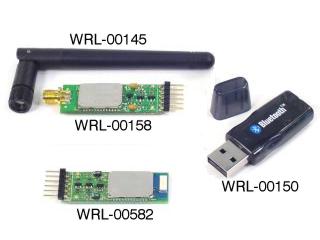 BlueSMiRF modules and accessories.
Using a DC-02 data cable as a base, remove the violet wire's female connector from the black housing on one end. Refer to Figure 1 for an example of how to easily remove a connector from the housing.
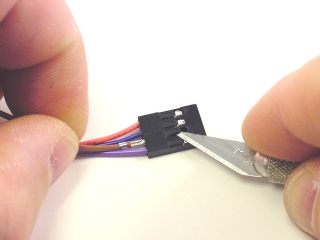 Figure 1.
Cover the exposed connector with heatshrink to avoid shorts. Your cable should look like Figure 2.
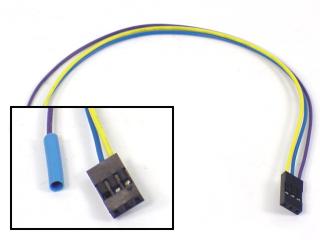 Figure 2.
Connect the data and power cables to the BlueSMiRF as shown. Refer to Table 3 and the wiring diagram following Step 4.
 Figure 3.
BlueSMiRF Connections (Table 3)
| BlueSMiRF Pin | Wire |
|---|---|
| CTS-I | Violet (heat shrink end) |
| PWR | Power cable — Red (+) |
| GND | Power cable — Black (−) |
| TX-O | Yellow |
| RX-I | Blue |
| RTS-O | Violet |
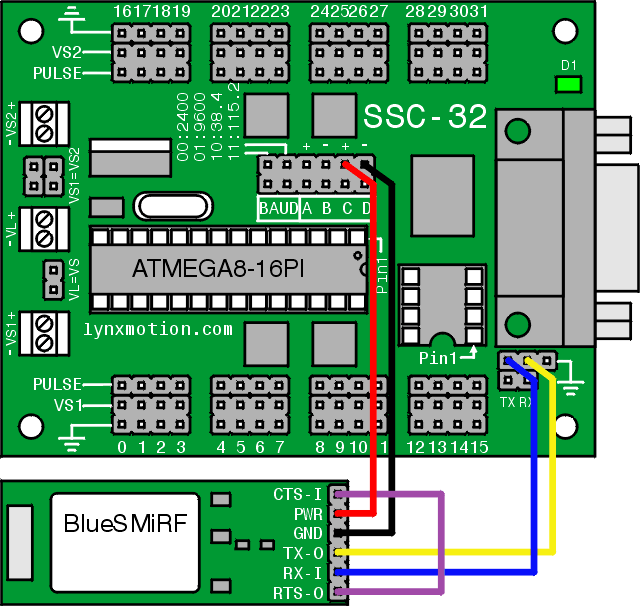
Connect the data and power cables to the SSC-32 as shown. Refer to Table 4 and the wiring diagram below.
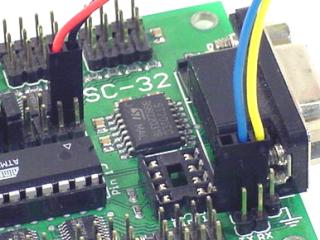 Figure 4.
SSC-32 Connections (Table 4)
| SSC-32 Pin | Wire |
|---|---|
| TX | Blue |
| RX | Yellow |
| + | Red |
| GND | Black |
Wiring Diagram
Set the SSC-32's baud rate to 9600 using the jumper configuration shown in Figure 5.
 Figure 5 (9600 baud jumper config).
Install the BlueSoleil program included with the Bluetooth USB Dongle. Open the program and plug the dongle into the computer. The "Welcome to Bluetooth" dialog (Figure 6) should appear. Enter a device name, select a device type, and click OK.
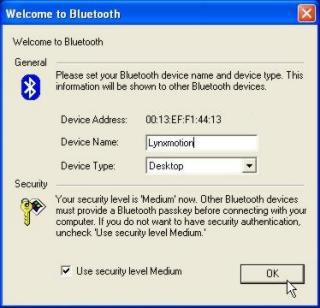 Figure 6.
Apply power to the SSC-32 and click the orange "sun" in the center of the BlueSoleil screen to search for Bluetooth devices.
The SparkFun device may initially appear as a device address rather than a name. Wait until BlueSoleil finishes searching and the name appears before continuing.
 Figure 7.
Right-click the SparkFun-BT icon and click "Refresh Services". Then right-click again and select Connect > Bluetooth Serial Port Service.
On first connection, the "Quick Connect" dialog will appear. Note which COM port is listed — you will need it in Step 9.
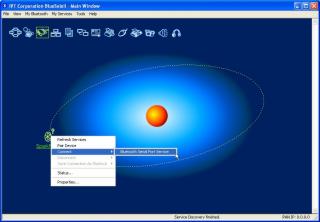 Figure 8.
Download and install LynxTerm. Click "Setup" in the Port section, set the baud rate to 9600, and set the COM port to the one noted in Step 8.
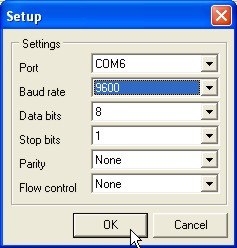 Figure 9.
Click "Setup" in the Terminal section. Match the settings shown in Figure 10. Verify that "Send line feeds with carriage return" is turned OFF.
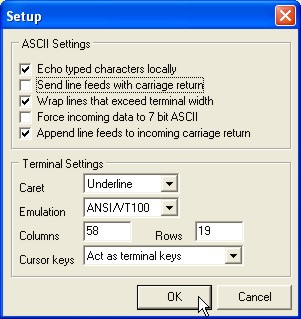 Figure 10.
In the terminal, type ver and press Enter to test connectivity — you should see the firmware version returned. Then type +++ and press Enter to activate Configuration Mode on the BlueSMiRF. You should see OK returned.
 Figure 11.
Type AT and press Enter — you should see OK confirming communication. Then type ATSW20,472,0,0,1 and press Enter to change the BlueSMiRF baud rate to 115.2k. This command does not return an OK.
Terminal applications do not allow Backspace. If you make a typo, press Enter and retype the command.
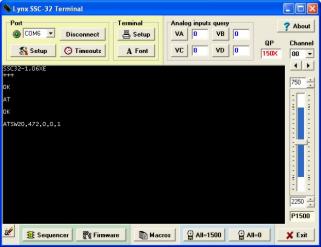 Figure 12.
Type ATSI,8 and press Enter. You should see OK and 01D8,0000,0000 — the baud rate in hexadecimal. If the value is different, repeat Step 12.
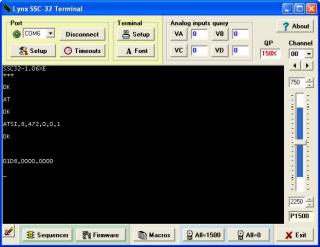 Figure 13.
In LynxTerm, click "Setup" in the Port section and change the baud rate to 115200. Then disconnect from LynxTerm (press "Disconnect" in the Port section) and from BlueSoleil (right-click SparkFun icon → Disconnect → Bluetooth Serial Port Service). Turn off the SSC-32.
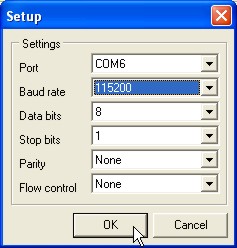 Figure 14.
Set the SSC-32's baud rate to 115.2k using the jumper configuration shown in Figure 15. Turn the SSC-32 back on. Reconnect BlueSoleil, then reconnect LynxTerm.
Type ver and press Enter for the final test — the firmware version should appear.
Congratulations! You can now control your robots without wires!
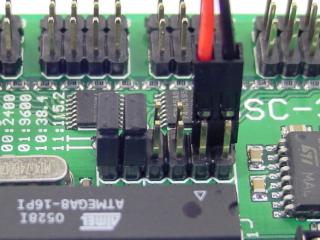 Figure 15 (115.2k baud jumper config).
LynxTerm did not require timeout changes for reliable communication. However, when using the SEQ-01, click "Timeouts" and refer to Figure 16 for recommended values. Experiment to find the smallest values that still allow reliable communication.
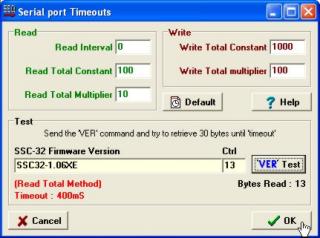 Figure 16 (SEQ-01 timeout values).