
BRAT Biped Autonomous Water Bottle Attacking Tutorial
Biped BRAT Autonomous Water Bottle Attacking Tutorial
Updated March 27, 2012
Safety first! Wear eye protection and never touch a powered robot!
Hardware required: Bot Board II, BASIC Atom Pro 28, Sharp GP2D12 sensor.
Software & downloads:
- BASIC Micro Studio
- BRAT Mech Servo Offset Finder Program
- Autonomous Water Bottle Attack Code
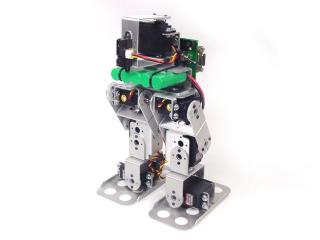
Biped BRAT.
Depending on how you've built your BRAT, you may need to change the orientation of the U-Channel to match Figure 1.
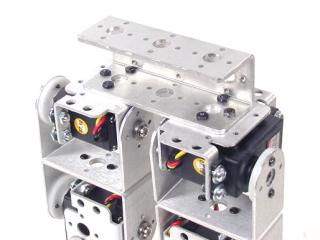 Figure 1.
Attach an ASB-18 to a multi-purpose bracket as shown using the included hardware.
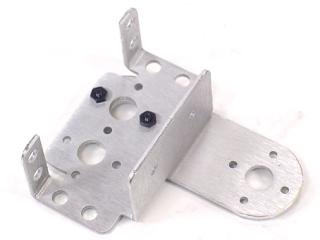 Figure 2.
Attach a long "C" bracket to the multi-purpose bracket as shown. Refer to Figure 3-1 for ball bearing detail.

Figure 3-1 — Ball bearing detail.
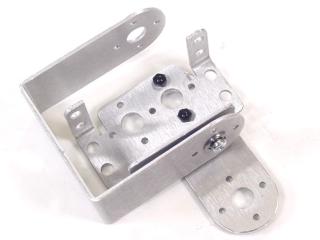 Figure 3-2.
Attach the pan assembly and electronics carrier to the U-Channel as shown. Refer to Figure 4-1 for mounting detail.
Figure 4-1 — Mounting diagram.
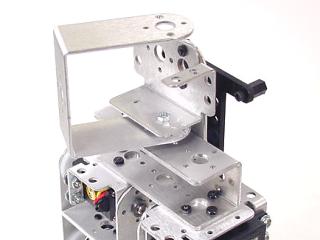 Figure 4-2.
Insert the pan servo into the assembly and secure with servo attachment hardware and two #2 tapping screws.
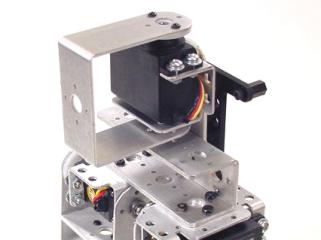 Figure 5.
Attach the Bot Board II to the electronics carrier using four 1/4" hex socket cap screws.
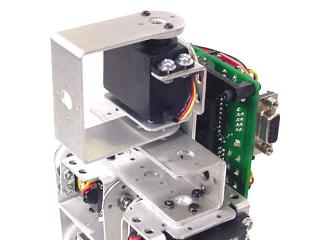 Figure 6.
Using double-sided tape, attach the GP2D12 sensor to the front of the pan long "C" bracket. Orient the sensor exactly as shown in Figure 7.
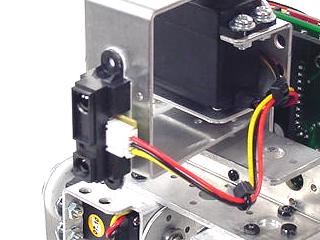 Figure 7.
Plug all servos and the sensor into the appropriate channels per Table 8. Note: P9 is used by the speaker and cannot be used for a servo.
| Bot Board I/O | Connection |
|---|---|
| P4 | Left Ankle |
| P5 | Left Knee |
| P6 | Left Hip |
| P7 | Right Ankle |
| P8 | Right Knee |
| P10 | Right Hip |
| P11 | Sensor Pan Servo |
| P19 (AX3) | GP2D12 Sensor |
Set the Bot Board II jumpers per Table 9. The VS to AX0 jumper enables battery voltage monitoring — the robot can beep when the battery is low. Refer to Figure 9 for the jumper layout.
| Bot Board II Jumper Settings (Table 9) | |
|---|---|
| Enable | A, B, and C buttons |
| 5V | I/O Group 0–3 |
| VS | I/O Groups 4–7 and 8–11 |
| Enable | SPKEN (Speaker Enable) |
| Enable | VS (Servo Voltage) to AX0 (P16) |
Figure 9 — Jumper diagram
Download and install BASIC Micro Studio. Download the BRAT Mech Servo Offset Finder Program, load it into the IDE, and program the Atom Pro. Use the buttons to adjust offsets:
- A — decrease servo offset by 5µs
- C — increase servo offset by 5µs
- B — change which servo is being adjusted, and save offsets (order shown in Figure 10)
If the Speaker is enabled, pressing B plays a tone that rises in pitch as you cycle through servos, and drops to a longer lower tone when returning to Start.
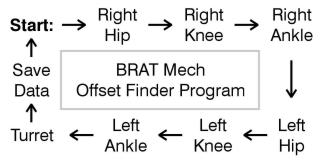 Figure 10 — Offset finder sequence.
Place the robot as close to neutral as possible and turn it on. It should hold the neutral position resembling Figures 11-1 through 11-3. If any joint is off by more than 15°, remove the servo horn, rotate to align, and reattach. Use the A, B, and C buttons to fine-tune.
Note: HS-422 hip servos may oscillate when the robot is lifted — this is normal and minimal when walking. Higher voltage worsens oscillations. Higher-power servos (HS-475, HS-485, HS-645) do not exhibit this.
After adjusting all servos to match Figures 11-1 through 11-3, pressing B saves the offset values to the Atom Pro's EEPROM.
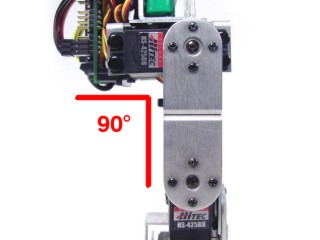 Figure 11-1 (front view).
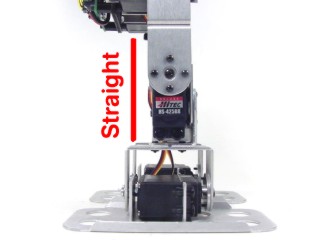 Figure 11-2 (side view).
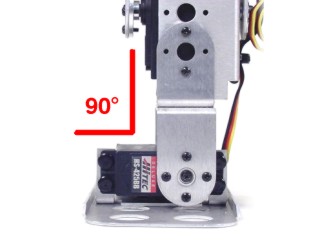 Figure 11-3 (rear view).
Download the BRAT Autonomous Water Bottle Attack Code, load it into the IDE, and program your BRAT.
On startup the robot beeps three times to confirm the download. The BRAT then scans for an object — if nothing is detected it turns in place and scans again, repeating until an object is found.
When an object is detected the BRAT walks toward it, adjusting direction as needed. Once in kicking range it beeps, aligns into kicking position, and kicks. After kicking it scans to confirm the object is down, then resumes scanning for a new target.