
LSS-PRO Configuration Software
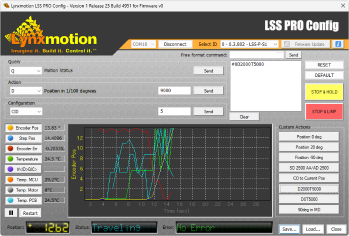

Table of Contents
Description
The Lynxmotion Smart Servo PRO Configuration Software (“LSS PRO Config” for short) is intended to be a tool to quickly interact with the Lynxmotion Professional Smart Servos. Features include sending action and configuration commands, queries (and receiving the reply), updating the firmware, monitoring sensor data and more. The software works on Windows 7 operating systems and above.
NOTE: The software can be connected to multiple servos, but the interface can only control and communicate with one at any time (unless using the free format commands described below). Each servo must have a unique ID. The servo(s) must be powered correctly and connected to the computer via USB from the first servo in the BUS.
User Guide
[lorren Ipsum]
Connection

- Select your COM port in the drop down menu.
- Click on the "Connect" button.
- In the "Select ID" drop down menu, you will find all the LSS-P actuator connected. Select the desired ID, the interface will then display and control that single actuator.
The software will communicate with all the actuator connected to the CAN bus from the first actuator USB however only one at a time can be selected. Some functions are available as well using the "254 - All Servos" selection like the "Custom Actions" or "Free format command".
Status

This is a section to directly give information to the user on what's happening with their actuator.
- Position of the actuator including any adjustment to the Origin Offset.
- Status of what the actuator is currently doing. (A list of the different statuses is available HERE)
- Errors that are happening. (A list of the different errors is available HERE)
Query
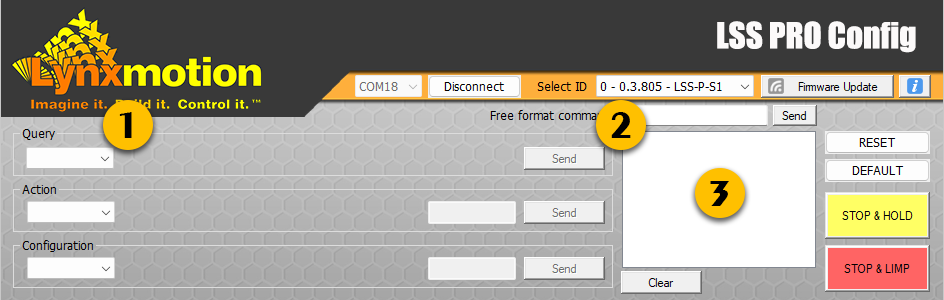
- Use the drop down menu to select the available Query. A quick explanation is provided in text but for more information click HERE.
- Click the "Send" button to initiate the Query.
- The Query protocol command will be displayed here as well as the answer from the actuator. (ex: #1QID / *1QID1)
Action
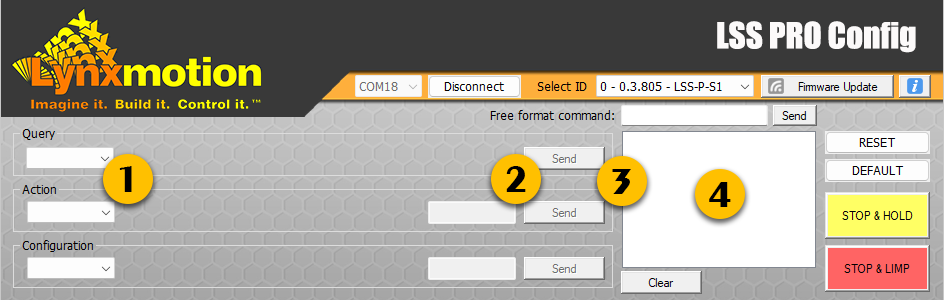
- Use the drop down menu to select the available Action. A quick explanation is provided in text but for more information click HERE.
- Input the value of the Action required in the text input field. (ex: 9000 for a 90deg move)
- Click the "Send" button to initiate the Action.
- The Action protocol command will be displayed here and the actuator should be doing it.
Configuration
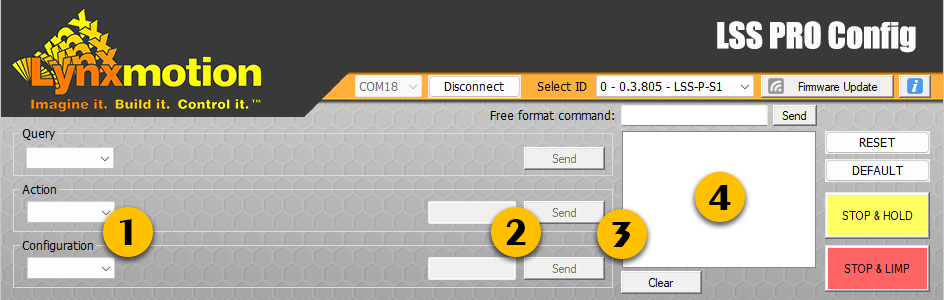
- Use the drop down menu to select the available Configuration. A quick explanation is provided in text but for more information click HERE.
- Input the value of the Configurationrequired in the text input field. (ex: 1 for an ID change to 1)
- Click the "Send" button to initiate the Configuration.
- The Configuration protocol command will be displayed here.
Telemetry
The graph within the software is used to display output of any query commands, which can include sensor data or calculated data. To activate a specific value, click on the button and click again to disable it.
Custom Query
To change the query for a specific button, you have to do a "CTRL + CLICK" on the desired button, this interface will then be displayed.
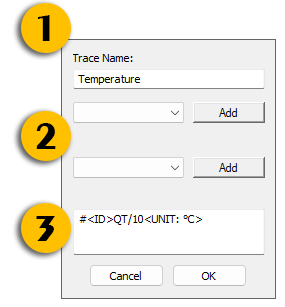
- Trace Name: Displayed name for that particular query.
- Two separate "Add" button and drop down are present, they are shortcuts to add to the query bellow.
- Actual query that will be sent to the actuator plus displayed units for the interface.
Saving Data
Custom Actions
[lorren Ipsum]
Free format command
[lorren Ipsum]
Firmware Update
[lorren Ipsum]