
BlueSMiRF Installation Tutorial
BlueSMiRF Installation Tutorial
By James Frye — Updated May 21, 2010
This tutorial applies for Windows XP and Vista.
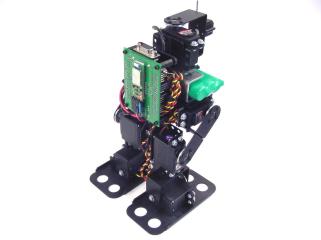
Completed robot.
You will need a Bluetooth USB Dongle (WRL-00150) plus one of the following modules:
- Bluetooth Modem BlueSMiRF — Internal ceramic antenna (WRL-00582)
- Bluetooth Modem BlueSMiRF RP-SMA — External antenna (WRL-00158) + 2.4GHz Duck Antenna RP-SMA (WRL-00145)
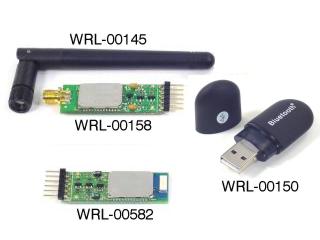 BlueSMiRF modules and accessories.
Using a DC-02 data cable as a base, remove the violet wire's female connector from the black housing on one end. Refer to Figure 1 for an example of how to easily remove a connector from the housing.
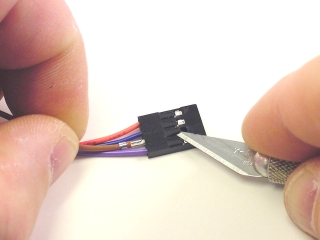 Figure 1.
Cover the exposed connector with heatshrink to avoid shorts. Your cable should look like Figure 2.
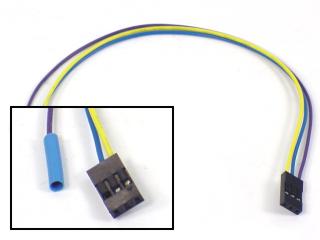 Figure 2.
Connect the data and power cables to the BlueSMiRF as shown. Refer to Table 3 and the wiring diagram following Step 4.
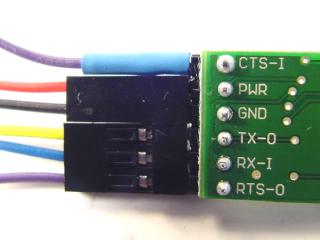 Figure 3.
BlueSMiRF Connections (Table 3)
| BlueSMiRF Pin | Wire |
|---|---|
| CTS-I | Violet (heat shrink end) |
| PWR | Power cable — Red (+) |
| GND | Power cable — Black (−) |
| TX-O | Yellow |
| RX-I | Blue |
| RTS-O | Violet |
Connect the data and power cables to the SSC-32 as shown. Refer to Table 4 and the wiring diagram below.
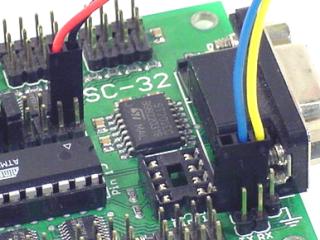 Figure 4.
SSC-32 Connections (Table 4)
| SSC-32 Pin | Wire |
|---|---|
| TX | Blue |
| RX | Yellow |
| + | Red |
| GND | Black |
Wiring Diagram
There are two versions of the BlueSMiRF — identify yours by the antenna colour:
- Blue antenna (new): defaults to 115.2K baud
- White antenna (old): defaults to 9600 baud
Set the SSC-32's baud rate jumpers to match your module. Refer to Figure 5 for jumper configurations.
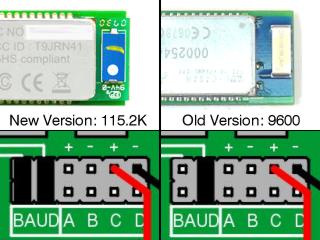 Figure 5 — Baud rate jumper configurations.
Step 6 — Windows Vista
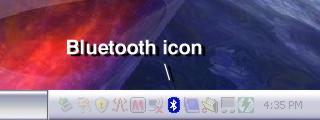
Plug the dongle into a spare USB port. A Bluetooth icon will appear in the taskbar. Double-click it to open the Bluetooth Devices screen, then click "Add..."

Step 7 — Windows Vista
Select "My device is set up and ready to be found" and click "Next".
Step 8 — Windows Vista
Select "SparkFun-BT / New Device" and click "Next".
Step 9 — Windows Vista
Enter the passkey for your module and click "Next":
· Blue antenna (new): 1234
· White antenna (old): default
Step 10 — Windows Vista
A dialogue will appear. Note the "Outgoing" COM port — you will need it in Step 16. Click "Finish". Then skip to Step 16.
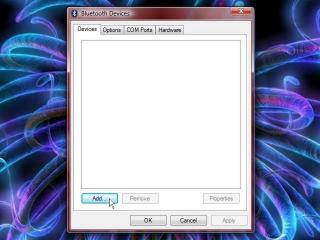 Figure 6.
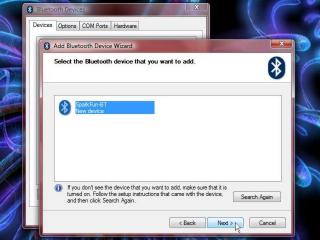 Figure 8.
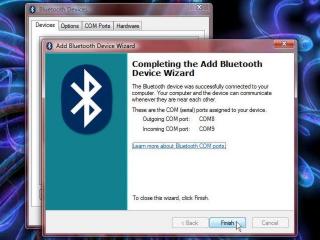 Figure 10.
Step 11 — Windows XP
Insert the CD and plug the Bluetooth Dongle into a spare USB port. When the CD screen appears, click "Install Buetooth Softwa".
Step 12 — Windows XP
Click "Next" through the installer screens, accept the license, and click "Install". If a Driver Signature Notice appears, click "OK". The installation takes a few minutes — multiple windows opening is normal. Click "Finish" when complete.
Step 13 — Windows XP
Right-click the Bluetooth taskbar icon → Quick Connect → Bluetooth Serial Port → Find Devices. Double-click "SparkFun-BT" to connect.
Step 14 — Windows XP
Enter the passkey for your module and click "OK":
· Blue antenna (new): 1234
· White antenna (old): default
After first connection, use the Quick Connect menu to connect/disconnect.
Step 15 — Windows XP
A dialogue will appear. Note the COM Port in the drop-down — you will need it in Step 16. Click "OK".
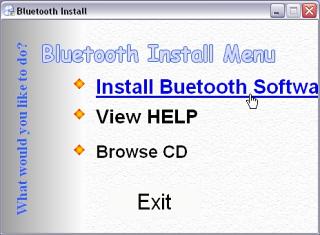 Figure 11.
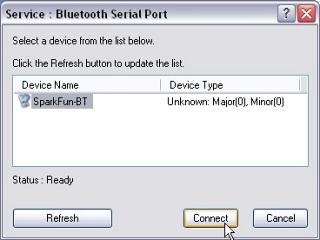 Figure 13.
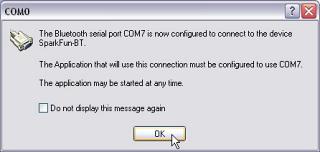 Figure 15.
Download and install LynxTerm. Click "Setup" in the Port section, set the COM port to the one noted earlier, and set the baud rate to match your BlueSMiRF:
· Blue antenna (new): 115200
· White antenna (old): 9600
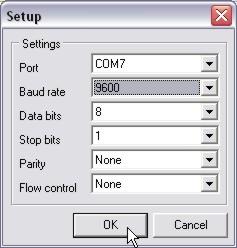 Figure 16.
Click "Setup" in the Terminal section. Match the settings shown in Figure 17. Verify that "Send line feeds with carriage return" is turned OFF.
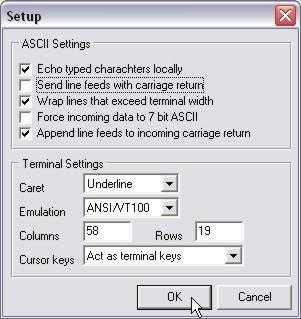 Figure 17.
Type ver and press Enter. You should see the SSC-32 firmware version returned.
- Blue antenna (new): if the version appears, you're done — skip to Step 23.
- White antenna (old): continue to Step 19 to upgrade the baud rate.
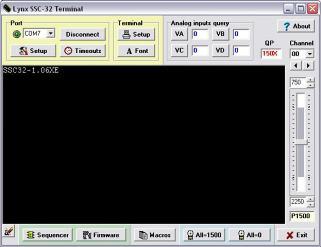 Figure 18.
Type +++ and press Enter to activate Configuration Mode — you should see OK. Then type AT and press Enter to confirm communication. Type ATSW20,472,0,0,1 and press Enter to change the baud rate to 115.2k. This command does not return an OK.
Terminal applications do not allow Backspace. If you make a typo, press Enter and retype.
 Figure 19.
Type ATSI,8 and press Enter. You should see OK and 01D8,0000,0000 — the baud rate in hexadecimal. If the value differs, repeat Step 19.
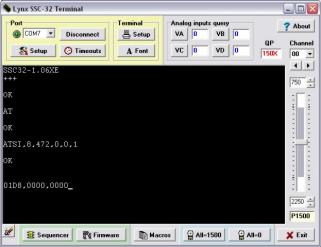 Figure 20.
In LynxTerm, click "Setup" in the Port section and change the baud rate to 115200. Disconnect from LynxTerm (press "Disconnect" in Port section). Disconnect from Bluetooth (right-click taskbar icon → Quick Connect → Bluetooth Serial Port → SparkFun-BT → OK). Turn off the SSC-32.
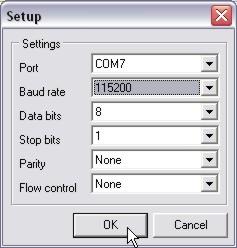 Figure 21.
Set the SSC-32 baud rate jumpers to 115.2k as shown. Turn the SSC-32 back on. Reconnect via Bluetooth (Steps 13–15), then reconnect LynxTerm. Type ver and press Enter — the firmware version should appear.
 Figure 22 (115.2k baud jumper config).
Congratulations! You can now control your robots without wires!
You can re-enable "Send line feeds with carriage return" in LynxTerm's Terminal setup. Just remember to turn it off again if you need to use the BlueSMiRF's configuration mode.
Figure 23.
LynxTerm did not require timeout changes for reliable communication. However, the SEQ-01 did. Click "Timeouts" and refer to Figure 24 for recommended values. Experiment to find the smallest values that still allow reliable communication.
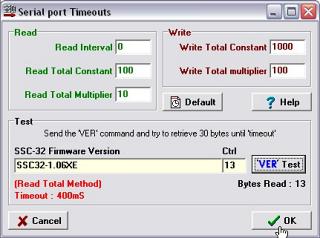 Figure 24 (SEQ-01 timeout values).