
BRAT Biped PS2 & BotBoarduino Tutorial
PS2 Biped BRAT Tutorial (BotBoarduino)
Updated April 9, 2012
Safety first! Wear eye protection and never touch a powered robot!
Hardware required: BotBoarduino, wireless PS2 controller/receiver.
Software: Arduino Software

Biped BRAT.
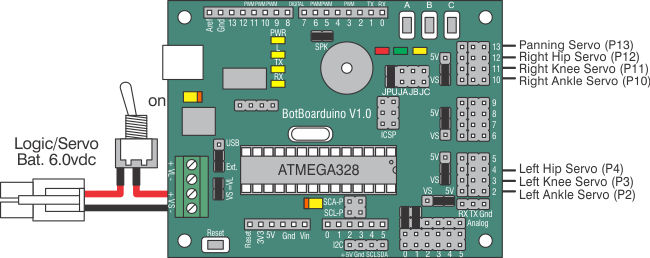
Make sure your servos are plugged into the appropriate channels per Table 1. Note: P1 is used for communications and P5 is used by the speaker — neither can be used for servos.
| BotBoarduino | Connection |
|---|---|
| P2 | Left Ankle |
| P3 | Left Knee |
| P4 | Left Hip |
| P10 | Right Ankle |
| P11 | Right Knee |
| P12 | Right Hip |
| P13 | Panning Servo (Optional) |
Set the BotBoarduino jumpers per Table 2. The VS to P0 (Analog 0) jumper enables battery voltage monitoring — the robot beeps when the battery is low. Refer to Figure 2 for the jumper layout.
| BotBoarduino Jumper Settings (Table 2) | |
|---|---|
| Enable | A, B, and C buttons (JA, JB, JC) |
| 5V | Analog Group |
| VS | I/O Groups 1–5 and 6–9 |
| Enable | SPK (Speaker) |
| Enable | VS (Servo Voltage) to P0 (Analog 0) |
Figure 2 — Jumper diagram
Download and install the Arduino Software. Install the PS2X library — instructions for installing libraries are available here. Download the BRAT code from GitHub.
Open the .ino file in the IDE, program the BotBoarduino, then power the robot down.
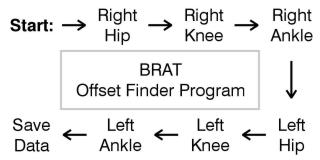 Figure 3 — Offset finder sequence.
Place the robot as close to neutral as possible, hold the "A" button, and turn it on. It should hold the neutral position resembling Figures 4-1 through 4-3. If any joint is off by more than 15°, remove the servo horn, rotate to align, and reattach.
- B — decrease servo offset by 1°
- C — increase servo offset by 1°
- A — change which servo is being adjusted, and save offsets. When the program reaches "Save Data" it saves offsets and runs the program. If you make a mistake, restart while holding A.
If the Speaker is enabled, pressing A plays a tone that rises in pitch as you cycle through servos.
Note: HS-422 hip servos may oscillate when lifted — normal and minimal when walking. Higher voltage worsens this. HS-475, HS-485, HS-645 servos do not exhibit this.
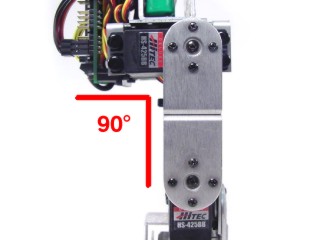 Figure 4-1 (front view).
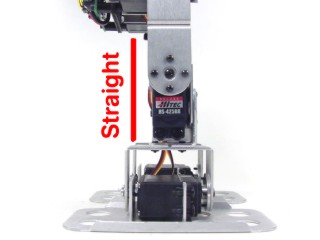 Figure 4-2 (side view).
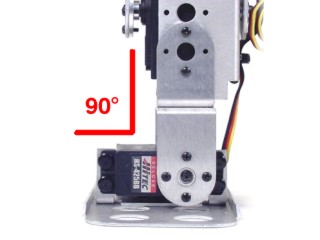 Figure 4-3 (rear view).
Repeat this process on one end of two 6" servo extender cables:
- Use an exacto knife to carefully pry up the black tabs and slip the wires out of the housing.
- Remove the black housing completely and set aside.
- Cover the header pin receptacles with 1/2" of heat shrink.
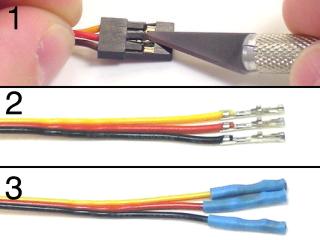 Figure 5.
Plug the cables into the PS2 receiver and BotBoarduino per Table 7, and update the jumper settings as shown. To adjust offsets later, unplug the PS2 receiver and replace the JA, JB, and JC jumpers.
| BotBoarduino Connections (Table 7) | ||
|---|---|---|
| Cable 1 | Black | P6 |
| Red | P7 | |
| Yellow | P8 | |
| Cable 2 | Black | GND |
| Red | 5VDC | |
| Yellow | P9 | |
| Jumper Settings | ||
| Disable | JPU (Remove JA, JB, JC) | |
| 5V | I/O Group 12–15 | |
Schematic — double-check connections below. PS2 cable colour reference
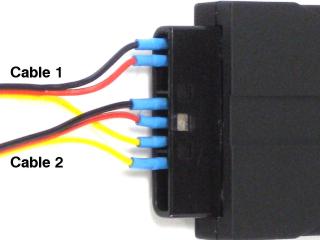
Figure 6 (cable connections).
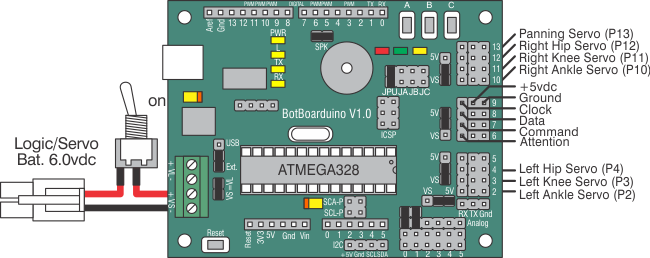
Figure 7 — Full wiring schematic.
The PS2 control commands are shown in Table 8. To adjust servo offsets later, unplug the PS2 receiver and replace the JA, JB, and JC jumpers.
| PS2 Button | Command |
|---|---|
| Left Joystick Forward/Back | Walk forward/backward |
| Left Joystick Left/Right | Turn in place left/right |
| X | Return robot to home position |
| △ | Headbutt |
| L1 | Kick with left leg |
| R1 | Kick with right leg |
| D-pad Up | Get up from face-down position |
| D-pad Down | Get up from back-down position |
| Start | Enable/Disable standby rest mode (enabled by default) |
| Select | Change stride length |