
The Complete H3/H3-R Tutorial (BotBoarduino) v2.0
The Complete H3/H3-R Tutorial v2.0
Updated June 7, 2012
This guide applies to the BotBoarduino. The purpose is to use the Hexapod Calibration program to calibrate the servos and program the BotBoarduino for PS2 remote control.
Note: PS2 control programs have been verified to work with Lynxmotion wireless controllers. Non-Lynxmotion controllers cannot be guaranteed.
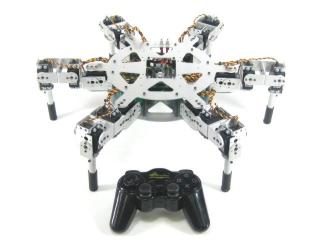
AH3-R

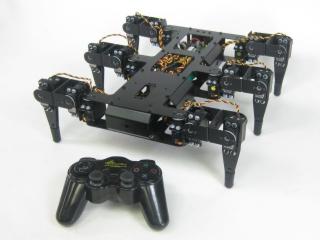
BH3-R
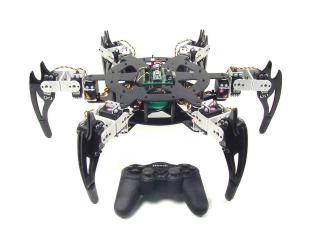
BH3
CH3-R
Hardware & Software
Hardware: SSC-32 | BotBoarduino | PS2 Cable / PS2 Wireless Controller | Hexapod 3 / 3-R
Software: Hexapod Calibration | Arduino Software
Set the robot up on a stand such as a CD spindle. Connect the USB cable to your PC and to the BotBoarduino. Power up the robot. Verify that the green LEDs on both the BotBoarduino and SSC-32 light up. The SSC-32's LED is NOT a power indicator — it lights to indicate the SSC-32 is functioning properly. It remains lit until it receives serial data, then blinks when receiving data. The servos may jump but will not hold position yet.
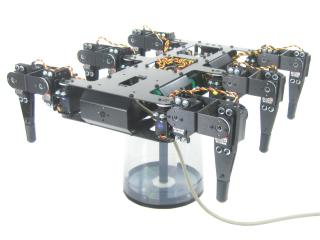 Figure 1-1.
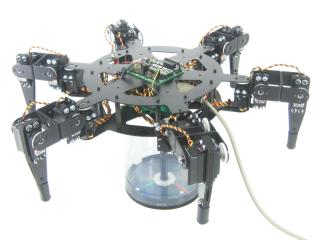 Figure 1-2.
Modify a 6" servo extender cable: remove the header pins so you have two female ends. Use an exacto knife to gently pry the tab up and pull the red wire free on one end. Cover the exposed connector with heat shrink to avoid accidental shorts.
Remove the TX and RX jumpers from the lower-right corner of the SSC-32, and plug the unmodified end of the cable in: yellow on TX, red on RX, black on ground.
Plug in extra lengths of 18–24AWG wires to VL on the SSC-32 with the 9VDC battery clip — these will power the BotBoarduino.
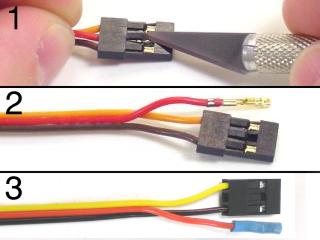 Figure 2.
Remove the DB9-enable jumpers and install the unmodified end of your 6" servo extender cable on the TTL serial communication posts. The black wire is closest to the edge of the board, and the yellow wire is on RX.
See the schematic below for detailed information.
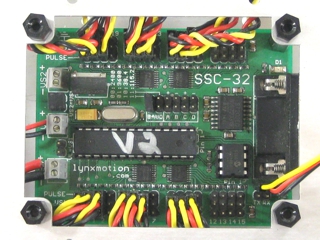 Figure 3.
Remove the 3/8 x 4-40 screws holding the SSC-32 and install the BotBoarduino using the same screws. Attach the red and black wires from the SSC-32 to the VL input, with black on (−) and red on (+). Plug the red wire of your modified cable into pin 12 and the yellow wire to pin 13.
Install the Playstation 2 cable as illustrated in Figure 4-1. Refer only to Figure 4-1 for connection information — cable colors may be outdated. A complete listing of possible colors is available here.
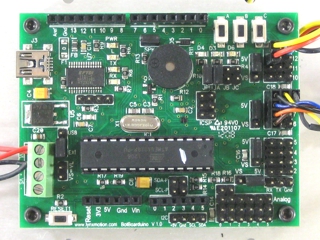 Figure 4.
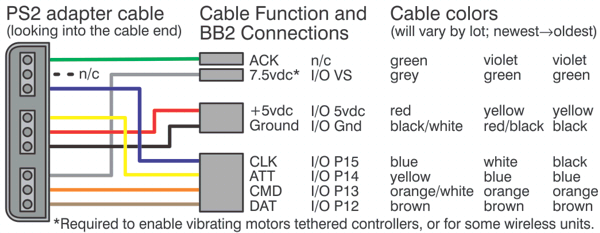
Figure 4-1.
Schematic. Double check your connections against the schematic below.
| Servo Letter Definitions | ||
|---|---|---|
| Left Right |
Rear Middle Front |
Knee Vertical Horizontal |
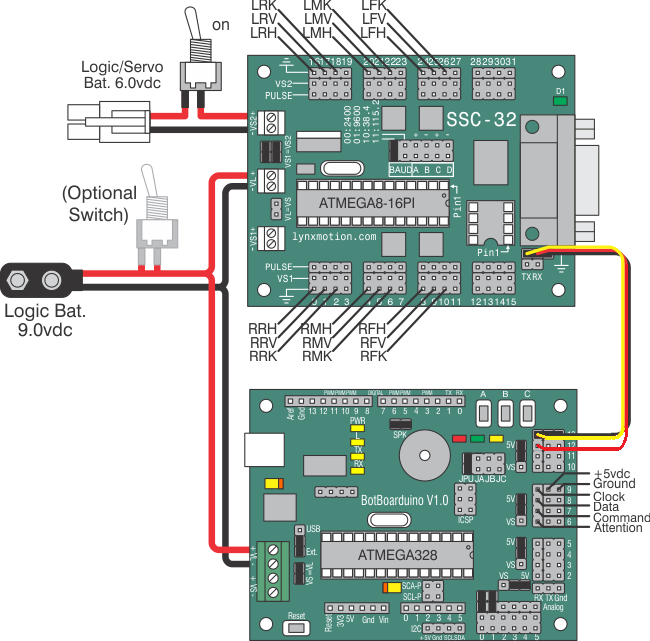
Schematic.
Download the Arduino software and install it. Download the robot code here.
Extract the .zip file to a folder named exactly "BotBoarduino_CH3R_PS2" — the folder name is required. Open BotBoarduino_CH3R_PS2.ino in the Arduino software, turn on the robot, and click Upload (the small right-pointing arrow).
Note: in some cases you may need to reverse the Attention/Command/Data connector for the PS2 receiver to function with the BotBoarduino.
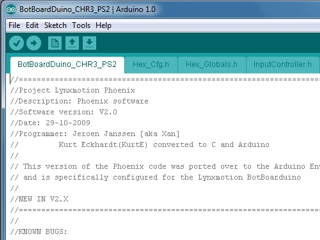 Figure 5.
At this point the robot can move, but since the legs are not calibrated it will look sloppy. Download the Hexapod Calibration program. Unzip and run the installer — a desktop icon will be created automatically.
 Figure 6.
Hold the "A" button on the BotBoarduino and apply power to force the robot into calibration mode. Open the Hexapod Calibration program — it will automatically detect the SSC-32 on ports 1–30 and display the firmware version.
Click "All=1500" to enable the servos. The legs should move into position and hold. If they go limp after moving, the battery is low — the SSC-32's green LED will be steady as a clue. If the legs look radically misaligned, remove the center servo horn screw, pull the horn off, reposition, and replace. Don't worry about offsets under 15° — they'll be corrected in the next step.
Note: click "inline" for a more accurate visual if you don't have a circular chassis.
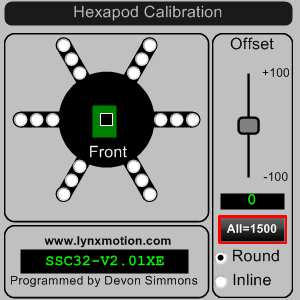 Figure 7.
Use the servo offset adjustment to fine-tune leg alignment. The goal is to align each leg perpendicular to the chassis with the knee forming a perfect right angle (see Figures 8-2 and 8-3).
Select a hip servo by clicking its radio button. Move the Offset slider — use the scroll wheel or arrow keys for fine tuning. After aligning the hip, move to the next servo closest to the body, and finally adjust the knee servo. Previously adjusted servos are marked red to track your progress. Repeat for all legs.
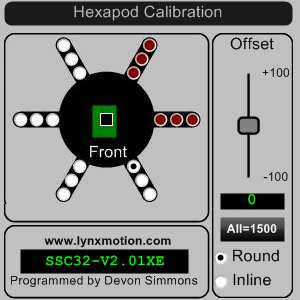 Figure 8-1.
 Figure 8-2.
 Figure 8-3.
Mount the PS2 cable to the chassis using double-sided foam tape on the bottom of the robot as shown. This makes it easier to swap controllers if needed.
 Figure 9.
The default is Walking mode 1. Use the Left joystick to translate (move without turning) and the Right joystick to rotate. D-Pad Up/Down adjusts body height. Triangle switches between 35mm walking height and lowered position. Circle puts the body on the floor in resting position.
L1, L2, Circle, and X trigger special body moves modes where the hexapod stops walking and the joysticks change function. See Table 10 below.
| Button | Function |
|---|---|
| Common Controls | |
| Start | Turn robot on/off |
| R3 | Switch Walk mode 1 / 2 |
| L1 | Toggle Shift mode |
| L2 | Toggle Rotate mode |
| X | Toggle GP Player mode |
| O Circle | Toggle Single Leg mode |
| □ Square | Toggle Balance mode |
| △ Triangle | Switch 35mm height / lowered |
| D-Pad Up | Body up 10mm |
| D-Pad Down | Body down 10mm |
| D-Pad Left | Decrease speed by 50mS |
| D-Pad Right | Increase speed by 50mS |
| Walk Mode Controls (default) | |
| Select | Change gaits |
| Left Joystick | Mode 1: Walk/strafe | Mode 2: Disabled |
| Right Joystick | Mode 1: Rotate | Mode 2: Walk/rotate |
| R1 | Toggle double gait travel speed |
| R2 | Toggle double gait travel length |
| Button | Function |
|---|---|
| Shift Mode Controls | |
| L1 | Turn Shift mode off |
| Left Joystick | Shift body X/Z |
| Right Joystick | Shift and rotate body Y |
| Rotate Mode Controls | |
| L2 | Turn Rotate mode off |
| Left Joystick | Rotate body X/Z |
| Right Joystick | Rotate body Y |
| Single Leg Mode Controls | |
| O Circle | Turn Single Leg mode off |
| Select | Switch legs |
| Left Joystick | Move leg X/Z (relative) |
| Right Joystick | Move leg Y (absolute) |
| R2 | Hold/release leg position |
| GP Player Mode Controls | |
| X | Turn GP Player mode off |
| Select | Switch sequences |
| R2 | Start sequences |
PS2 Controls — Table 10.