
BRAT Biped PS2 & Bot Board II Tutorial
PS2 Biped BRAT Tutorial
Updated December 20, 2011
Safety first! Wear eye protection and never touch a powered robot!
Hardware required: Bot Board II, BASIC Atom Pro 28, wireless PS2 controller/receiver.
Software & downloads:
- BASIC Micro Studio
- BRAT Servo Offset Finder Program
- PS2 Control Code
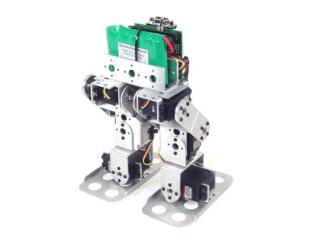
Biped BRAT.
Make sure your servos are plugged into the appropriate channels per Table 1. Note: P9 is used by the speaker and cannot be used for a servo.
| Bot Board I/O | Connection |
|---|---|
| P4 | Left Ankle |
| P5 | Left Knee |
| P6 | Left Hip |
| P7 | Right Ankle |
| P8 | Right Knee |
| P10 | Right Hip |
Set the Bot Board II jumpers per Table 2. The VS to AX0 jumper enables battery voltage monitoring — the robot beeps when the battery is low. Refer to Figure 2 for the jumper layout.
| Bot Board II Jumper Settings (Table 2) | |
|---|---|
| Enable | A, B, and C buttons |
| VS | I/O Groups 4–7 and 8–11 |
| Enable | SPKEN (Speaker Enable) |
| Enable | VS (Servo Voltage) to AX0 (P16) |
Figure 2 — Jumper diagram
Download and install BASIC Micro Studio. Download the BRAT Servo Offset Finder Program, load it into the IDE, and program the Atom Pro. Use the buttons to adjust:
- A — decrease servo offset by 5µs
- C — increase servo offset by 5µs
- B — change which servo is being adjusted, and save offsets (order shown in Figure 3)
If the Speaker is enabled, pressing B plays a tone that rises in pitch as you cycle through servos and drops to a longer lower tone when returning to Start.
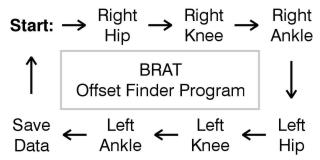 Figure 3 — Offset finder sequence.
Place the robot as close to neutral as possible and turn it on. It should hold the position resembling Figures 4-1 through 4-3. If any joint is off by more than 15°, remove the servo horn, rotate to align, and reattach. Use the A, B, and C buttons to fine-tune.
Note: HS-422 hip servos may oscillate when lifted — normal and minimal when walking. Higher voltage worsens this. HS-475, HS-485, HS-645 servos do not exhibit this effect.
After adjusting all servos to match Figures 4-1 through 4-3, pressing B saves the offset values to the Atom Pro's EEPROM.
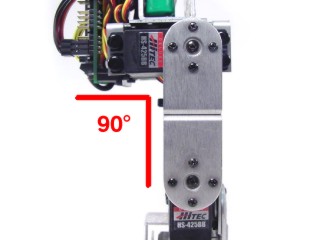 Figure 4-1 (front view).
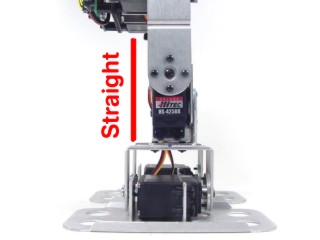 Figure 4-2 (side view).
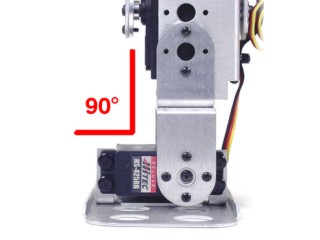 Figure 4-3 (rear view).
Download the PS2 BRAT Code, load it into the IDE, and program your BRAT.
Repeat this process on one end of both 6" servo extender cables:
- Use an exacto knife to carefully pry up the black tabs and slip the wires out of the housing.
- Remove the black housing completely and set aside.
- Cover the header pin receptacles with 1/2" of heat shrink.
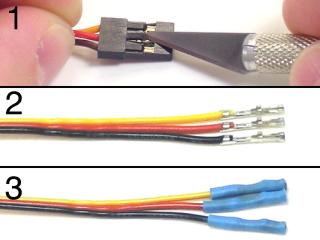 Figure 6.
Plug the cables into the Bot Board II per Table 7, and update the jumper settings as shown.
| Bot Board II Connections (Table 7) | ||
|---|---|---|
| Cable 1 | Black | P12 |
| Red | P13 | |
| Yellow | P14 | |
| Cable 2 | Black | GND |
| Red | 5VDC | |
| Yellow | P15 | |
| Jumper Settings | ||
| Disable | A, B, and C buttons | |
| 5V | I/O Group 12–15 | |

Figure 7 (cable connections).
Figure 7 — Wiring diagram.
The PS2 control commands are shown in Table 8.
| PS2 Button | Command |
|---|---|
| Left Joystick Forward/Back | Walk forward/backward |
| Left Joystick Left/Right | Turn in place left/right |
| X | Return robot to home position |
| △ | Headbutt |
| L1 | Kick with left leg |
| R1 | Kick with right leg |
| D-pad Up | Get up from face-down position |
| D-pad Down | Get up from back-down position |
| Start | Enable/Disable standby rest mode (enabled by default) |
| Select | Change stride length |