
Sumo for Bot Board & BASIC Atom or Pro with Scorpion
| Sumo for
Bot Board / BASIC Atom or Pro / Scorpion.
Updated: 02.15.06 By Jim Frye & Beth Frye The goal of this tutorial is to build an autonomous sumo using a Bot Board with an Atom 28 or Pro microcontroller, Scorpion motor controller, and various sensors. Note, in our examples we are using a Viper sumo chassis. However, the fundamental principals explained in this tutorial can be used with any of our sumo chassis. Minor changes to the code may be necessary and are encouraged to fine-tune the performance of your sumo set up. These modifications are simple. For example, a six-wheel-drive sumo will require a larger turning value than a two-wheel-drive to obtain the same results. This is a work-in-progress, and will be updated as we proceed with the project. |
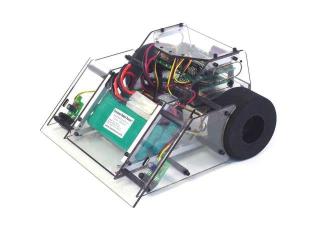 Current Picture (as of 03.01.04) |
||||||||||||||||||||||||||||||||||||
| 1. Attaching
Scorpion to Chassis
Step 1. Consult the Scorpion users manual to disable mixing (tank steer mode) and disable the battery elimination circuitry (BEC). Cut the servo cables to about 3" length, and solder them in the Left and Right positions. Use double-sided foam tape to attach the Scorpion to the chassis as shown in the picture. |
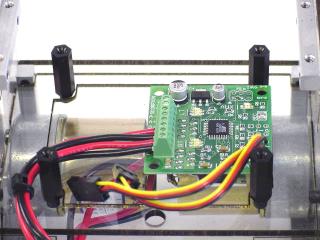 Figure 1-1. |
||||||||||||||||||||||||||||||||||||
| 2. Wiring
Power to the Electronics
Step 1. Solder the wires onto the DPDT power switch as illustrated. While positioned as shown, flipping the toggle switch down will apply 9vdc to the Bot Board. Flipping the switch up will apply 9vdc to the Bot Board and 14.4vdc to the Scorpion. This is useful for disabling the motors while programming. |
 Figure 2-1. |
||||||||||||||||||||||||||||||||||||
| Step 2.
This image illustrates the power switch installed, the 14.4vdc leads going
to the Scorpion's battery inputs, and the motor wires connected to the
Scorpion's screw terminals. Observe polarity!
|
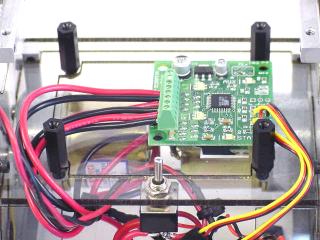 Figure 2-2. |
||||||||||||||||||||||||||||||||||||
| 3. Setting Up
and Installing the Bot Board and Atom
Consult the Bot Board users manual to provide VL to the power bus for I/O 0 - 3, and AX 0 - 3 for the Atom 28. Enable the onboard speaker and the pushbuttons / LEDs (simple user interface). Install the board as shown using the provided hardware. Carefully install the Atom into the Bot Board socket. Install the 9vdc wires from the switch harness. Observe polarity! Plug in the servo cables from the Scorpion with Left being I/O 14 and Right being I/O 15. Plug in the Single Line Detector cables with Left being I/O 2 and Right being I/O 3. |
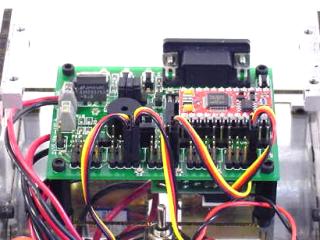 Figure 3-1. |
||||||||||||||||||||||||||||||||||||
| 4. Preparing
the Single Line Detectors
Install the charged 7.2vdc battery packs and the 9vdc battery. Turn on the power to the electronics only. Adjust the sensor positions to as low as possible. Place the robot on the sumo ring or other black surface. Adjust the threshold full counterclockwise, then clockwise until the red LED just lights. Then roll the robot to the ring edge, or other white surface, and the LED should go out. Do this to both sides to complete the line detector setup. |
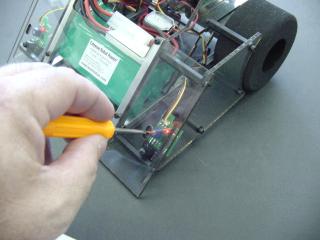 Figure 4-1. |
||||||||||||||||||||||||||||||||||||
| 5. Using
Single Line Detectors to stay in the ring
Download the latest version of the Basic Atom or Pro editor from Basic Micro's. Then download the proper program for your processor from Table 5-1. It uses the pulseout command, which requires updating every 20 mS. Load the program into the editor, and program the Atom chip. The Atom Pro 24 does not have a power on reset. This means you should press Reset after downloading to start the program running. This program incorporates a five-second delay which is required in sumo competitions. It then instructs the robot to go forward. If the white line is detected, the robot will stop, back up, and turn away from the detected line. For example, if the Left line detector sees the line, the robot will back up and turn right. The variable "backup" affects how long the robot will back up. The variable "turn" affects how long the robot will turn. Watch these videos to see how your robot should be acting: Without opponent. With opponent. |
|
||||||||||||||||||||||||||||||||||||
| 6. Alternate
Startup Behaviors
Download the alternate startup behaviors code from table 6-1 and load it into the editor. Program the Atom chip. (This program also has the stay-in-the-ring functionality of previous programs.) Now, when you power up the robot you can press either the A, B, or C buttons on the board. Each one will trigger a different startup behavior routine. For a summary of the behaviors and a video example of each, refer to table 6-1. Having multiple startup functions available gives you a strategic advantage over the opponent. For example, if you know that your opponent always goes forward and you don't think that you can get under their scoop, you can choose BehaviorA. This will allow you to ram into their side and push them out of the ring. |
|
||||||||||||||||||||||||||||||||||||
| 7. Setup of
Sharp GP2D12 Sensor
For the Atom Pro 24, plug in the sensors to P0 and P1. For the Atom 28, plug in the sensors to AX0 and AX1. Attach the sensors to the top of the robot as shown in Figure 7-1. We used two aluminum Single Ultrasonic Range Sensor Housing kits. You may want to use double-sided tape or another method. Note, make sure the sensors are "watching" the correct side of the robot! If you set this up incorrectly, your bot will run away from any approaching opponent. The sensor in P0 or AX0 should be watching the bot's Left side. The sensor in P1 or AX1 should be watching the bot's Right side. Table 7-1 holds a nifty little bit of code that you can use to adjust the position of your Sharp GP2D12 sensors. Just make a new .zip file for it. After you run the code, if you run your hand in front of the sensor a note will sound. The note raises in pitch as you get closer to the sensor. Note, this code will only work for the sensor on P0 / AX0 as is. To adjust the sensor on P1 / AX1, change "temp*10" to "temp2*10" and run the code. This code allows you to angle the sensors to look down in front of the robot and get an audio signal when they see something. Adjust the sensors as far down as possible without hearing sound. If you want to use Terminal1 in the editor to see the values produced by both sensors, remove the apostrophe from in front of the serout line. |
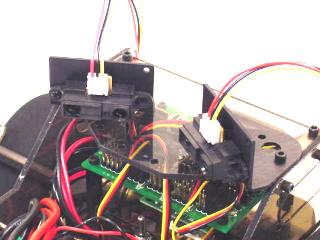 Figure 7-1.
|
||||||||||||||||||||||||||||||||||||
| 8. Using
GP2D12 to Seek Out Opponents
Download the opponent detection code from table 8-1 and load it into the editor. Program the Atom chip. (This program also has the stay-in-the-ring functionality and alternate startup behaviors of previous programs.) Now when you run this code, your bot will be able to detect and chase an opponent. This code also includes the GP2D12 testing code from the previous step. However, you'll need to remove the apostrophes from in front of "goto test" and "end" if you want to use it. When you want to run the rest of the program, just put the apostrophes back in. |
|
||||||||||||||||||||||||||||||||||||