
Bot Board II Manual
| Table of Contents | Links |
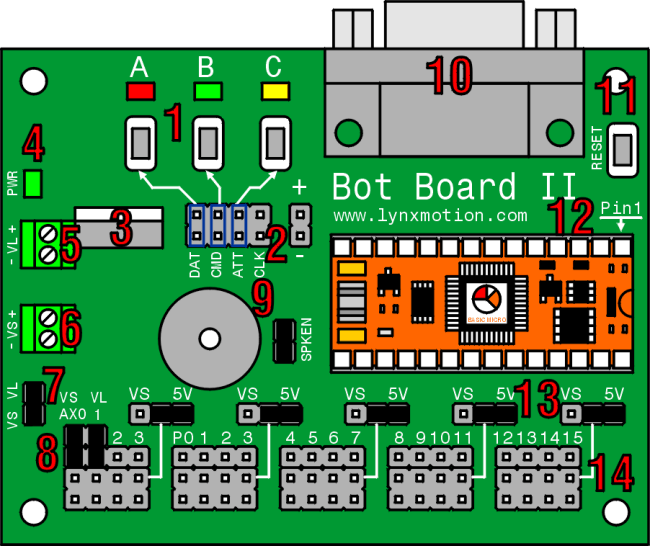
Bot Board II Hardware Information.
The image above illustrates the shorting bar jumpers (the black rectangles) as they are on the board as it is shipped. The jumpers are used to set operating parameters for the board. It should not be assumed that they are correct for your project as changes are likely to be required. Please consult the tutorial for your project for the proper shorting bar jumper positions.
The Bot Board II is 3.00" x 2.30" with 0.125" holes set in 0.15" from each edge.
- The 3 LEDs and Pushbuttons use only 3 I/O lines to make a simple user interface for your program. By making the I/O line a low output the LED
can be turned on. By briefly making the I/O line an input the I/O line can be read to see if a button is being pressed. However,
do NOT make the I/O line a high output and press a button, as damage to the I/O pin can occur. The shorting bars
outlined in blue will need to be
installed for these LEDs and Pushbuttons to be used.
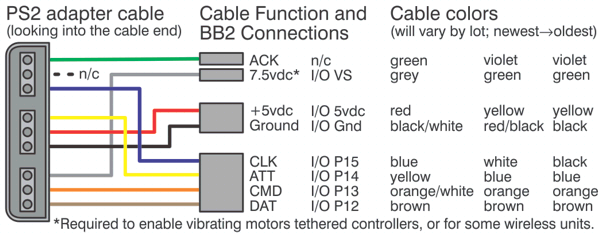
Chip I/O PB/LED Pin 12 A Red Pin 13 B Green Pin 14 C Yellow - This port is for connecting a Sony Playstation controller to use as a robot controller. The shorting bars in blue need to be removed, or you can use pins 12-15, which are electrically the same. Note, this will not work with a Basic Stamp 2, as it requires an inverter built into the Clock signal. The Lynxmotion, Sony, and Madcatz controllers we tested only required a 1K pullup on Pin 12, which is built into the board. Other brands may require a pullup on Pin 15, which is not included. Note, some controllers require the green wire to be connected to 7.5vdc to enable vibrating motors, or wireless operation. The Playstation 2 cables' coloring differs from different production runs. Please refer to the table in the Shorting Bars and Connections section to verify the color coding and connections for your cable.
- The Low Dropout regulator will provide 5vdc out with as little as 5.5vdc coming in. This is important when operating your robot from a battery. It can accept a maximum of 9vdc in. The regulator is rated for 500mA, but we are de-rating it to 250mA to prevent the regulator from getting too hot.
- This is a Power Good LED. When you have successfully applied power to the onboard regulator, the green LED will turn on.
- This is the VL (logic voltage) input. This input is normally used with a 9vdc battery connector to provide power to the microcontroller and
anything connected to the 5vdc lines on the board. This input can be used to isolate the VL from the VS (servo voltage).
Board Input VL + RED VL - BLACK - This is the VS (servo voltage) input. Servo voltage can be 4.8vdc to 7.2vdc. However, some micro servos will not tolerate more than 6vdc. This
input is used to provide power for the servos only, or to provide power to both VL and VS using the VS=VL jumper. See Item 7.
Board Input VS + RED VS - BLACK - This allows you to power the Servos and Logic from the same battery. It simply connects the VS input to the VL input. Caution, when using this option do NOT use the VL input.
- This allows the VL and/or VS inputs to be connected to two of the Atom 28's analog inputs through a 4:1 voltage divider. For example, if the
battery voltage were 9vdc, the analog input would see 2.25vdc.
Chip I/O Atom Pro Pin Use AX0 P16 V-Servo / General Purpose AX1 P17 V-Logic / General Purpose AX2 P18 General Purpose AX3 P19 General Purpose - This shorting bar enables the onboard speaker. To use the speaker, send the appropriate sound generating command to Pin 9. Note, the I/O pin drives a transistor amplifier. It does not drive the speaker directly.
- Simply plug a straight-through M/F DB9 cable from this plug to a free 9-pin serial port on your PC for programming the processor and receiving debug information. Alternately a USB-to-serial adapter will work well. Please see the USB-to-serial section for more information.
- This button will reset the micro when pressed. This can be useful for starting different programs depending on which SUI button is pressed on reset.
- This is where you plug in the hybrid microcontroller module. This can be an Atom 28, Atom Pro 28, Basic Stamp 2 series, OOPic-C, BASICX 24, or basically any BS2 pin compatible. The Atom modules provide an additional 4 I/O pins.
- This is where you configure the I/O bus center row to use VL (+5vdc from the onboard regulator) or VS (direct from the Servo Power Input). This is done in banks of four I/O pins. Caution, applying the servo voltage to this row with a 5vdc peripheral installed will cause damage to the peripheral.
- This is where you connect servos, motor controllers, sensors, etc. to the microcontroller. Use caution when connecting anything the the I/O bus. Never connect anything while the power is on.
Shorting Bar Jumpers and Connectors at a glance.
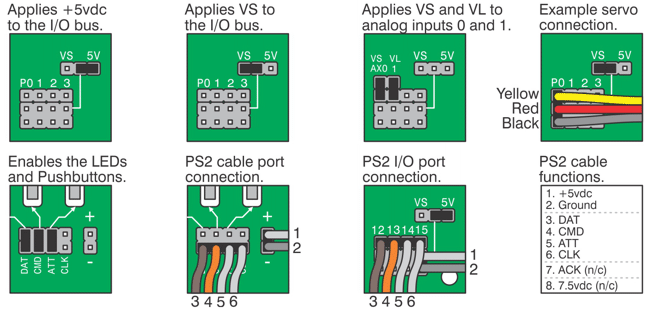
The Playstation 2 cables' coloring differs from different production runs. Please refer to the diagram below to verify the color coding on your cable.
What's Changed with the Bot Board II?
The Bot Board II has some simple but important changes compared to the original Mini Atom Bot Board design.
- The Playstation 2 (PS2) Game Controller Port on the Mini ABB was dedicated to Basic Stamp II (BS2) use. The port had a built-in inverter on the Data line which was required by the BS2. Because the inverter is not required by the Basic Atom processors, and the BS2 will not work with the newer 3rd party controllers anyway, we dropped the support for the BS2. The PS2 port is now dedicated to the Basic Atom or Basic Atom Pro.
- The Mini ABB originally had the PS2 Port on pins 4, 5, 6, and 7. This worked great with the Basic Atom 28. However, when the Basic Atom Pro 28 came out, there was an issue with P6 and P7 being 3.3vdc I/O pins. This prevented the PS2 controller from working with the Mini ABB when an Atom Pro was used. So we moved the port to Pins 12, 13, 14, and 15.
- We are also changing the default SSC-32 serial out pin from pin 15 to pin 8.
Remember these points if you are changing older code.
The green power (PWR) LED should glow if the regulator is getting the proper power. You must make sure to connect the battery or wall pack with the proper polarity. This means the red wire is positive (+) and the black wire is ground (-). If you connect the battery or wall pack with the polarity reversed, the regulator and the microcontroller can be instantaneously and permanently damaged! Check your wiring carefully before applying power.
The maximum voltage for VL is 9.6vdc. If you use a higher voltage the regulator may overheat and you could get burned!
Orient the microcontroller with its Pin 1 oriented toward the arrow by the Reset button. If the microcontroller is installed backwards it will not be damaged by the Bot Board, but it will not be recognized by the IDE.
Programming - USB to Serial Cables
If you are new to this please check out our programming tutorial.
The fastest way to program the Atom or Atom Pro microcontroller is with a PC that has a real serial port. If you have a desktop PC that does not
have a serial port it is recommended that you install a serial port card into the PC. We recommend the an FTDI USB to serial cable.
Note: FTDI based USB to serial cables have properties in their drivers called Latency and Buffer. You will need to reduce the size of the buffer
from 4k to 1k, and the Latency from 16 to 1. As drivers and hardware change it may be necessary to experiment with these values.
If you have trouble with a USB to Serial cable, please refer to our troubleshooting guide.