
LSS - RC PWM
Table of Contents
Standard RC PWM
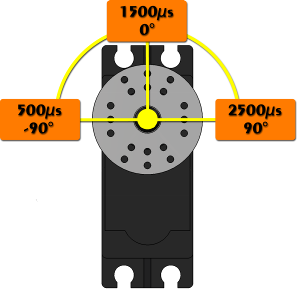
Normal RC servo motors have three pins; the black wire is ground (GND), the middle (normally red) wire is +V (4.8V to 6V for standard RC) and the last wire (commonly yellow or white) is the signal wire. The signal wire is meant to receive 5V PWM pulses which are repeated every 20-30 milliseconds. The onboard electronics time these pulses and match them to angular positions.
LSS RC Mode
All three Lynxmotion Smart Servo motors can be used with normal hobby remote control (RC) electronics including remote controls and RC servo controllers. Unlike normal RC servo motors however, the LSS motor configuration can be changed via programming. The current method to change from serial to RC mode is via the LSS - Button Menu.
Note: Each modes can have the rotation reversed but clockwise is standard. (equivalent to CW1 or CW-1)
- RC 180° mode (equivalent to sending CAR1800)


- RC 360° mode (equivalent to sending CAR 3600)


- RC Speed / wheel mode


Wiring - RC Mode
When in RC mode, only one connector should be attached, and either connector on the servo can be used. The servo cannot be daisy-chained.

Fourth pin (output channel):
Programmable Functionality
The functionality listed below applies to RC mode and can only via serial configuration commands. This means the servo must be connected to a computer (or other device like a microcontroller able to communicate serially) and the servo set to serial mode via the button menu. A detailed explanation of the commands can be found on the LSS - Communication Protocol page. These configurations are saved within the servo and are retained even if the servo loses power.
Config. Origin Offset: This command allows you to change the origin of the servo in relation to the factory zero position. The servo is shipped with the zero being centered on the side of the servo with the LED bar (image below)
Config. Angular Range: This is the total travel of the servo which is used in RC mode. The units are in tenths of degrees. The minimum value is 1 (0.1 degrees, which is essentially useless) up to 3600 (360.0 degrees). Note that 3600 represents the total travel, which can be interpreted as 360.0 degrees or ± 180.0 degrees where the center is in relation to the origin offset above.
Config. Speed (Degrees or RPM): This sets the maximum speed in wheel mode (specified in either tenths of degrees per second or in rpm) corresponding to a pulse of either 500 microseconds or 2500 microseconds, with 1500 microseconds as "stopped". Note that the set speed cannot be above that of the servo's maximum.
Config. Angular Acceleration / Deceleration: These commands set the angular acceleration and deceleration profiles. Normally this is an advanced feature.
Config. LED Color: You can set the default color of the RGB LED when in use. This is purely aesthetic.
Config. Direction of rotation: In certain applications, it is preferably to reverse the direction of the servo in relation to the pulse. See images below.
Configure First position (Pulse or Degrees): This feature allows you to specify a startup position in either tenths of degrees (in relation to the factory origin) or as a pulse. By default the servo will not move at power-up until a signal is sent.
RESET: This command resets all configurations within the servo to factory default based on the installed firmware.
Examples:
With the "Angular Range" set 240.0° (±120.0°; CAR2400) of movement with the same 500µs to 2500µs signal.

With the "Angular Range" set to 240.0° (±120°; CAR2400) and "Origin Offset" you can shift the center position and still get your 240.0° range.

It is also possible to setup pass the 360.0° mark like here for a 720° (±360°; CAR7200) total rotation.
